

La version française de cet article est ici.
I wrote this basic guide and tried to gather all the information on the topic at the time of writing. I recommend reading this article once, in its entirety, before embarking on the adventure and trying to make your own bread. It’s not difficult, it’s really just practice, but you need to have all the information before getting started.
First of all, you should know that there are several possible methods, several recipes, several ways to knead, several ways to mix… You can have good bread that is not necessarily the same as in a bakery. As you experiment, you will likely encounter bread where the dough has been overmixed or undermixed, rested too long or not enough… And you know what, that’s okay. This bread is edible, and you will learn from your mistakes and your experiments, in the environmental conditions that are your own. It’s a learning journey, not a magical recipe, and mistakes are part of the adventure. This experience will be rewarding; at worst, you can always eat this bread with your family.
These steps are spaced with rest times for the dough, which are essential. Making a good, well-fermented bread takes time. A recipe without long fermentation does not have the same nutritional and digestive benefits as a recipe that is lightly or not fermented, whether it is bread or a pastry.
Keep in mind that flour in Europe is different from flour in the United States; everything is relative and must be adapted to your own ingredients and conditions. You need to rely on textures rather than precise directions.
1. Refresh your sourdough starter so that it’s ready to taste
The day before, 6 to 12 hours before you plan to use the starter, take it out of the refrigerator and feed it with flour and water. For leavening action, we will use the active starter at its peak the next day.
In this recipe, we will use 60 g of sourdough starter. You want to feed your starter, at least 60 g of flour and 50 g of water: focus on the texture, not the quantities. I always like to refresh my starter generously, more than my recipe requires, to make sure I have enough starter and to keep some in my jar after use (sometimes you lose a lot of it between mixing with the spatula and transferring to the bowl).
In the worst-case scenario, if I have too much in my jar after use, I make a small recipe that requires little starter or uses small amounts of leftover starter. If you want to feed your starter at a minimum, you should feed it 40 g of flour and 20 g of water (for a total of 60 g of starter), while keeping a bit of the mother starter.

We get an even better result with a starter that has been taken out of the refrigerator and refreshed 2-3 times beforehand (so a few days earlier). From peak to peak, when the starter reaches its peak, take some of it and feed it again, and do this 2 to 3 times before using it to make bread.
Some people think it’s worth refreshing their starter every day and leaving it on the counter. They refresh it with small amounts to avoid waste, but since these people eat a lot of bread, they prefer to invest in flour and do it this way because the result is much better than with a starter taken out of the fridge and fed only once before use.
Personally, I take my sourdough starter out of the fridge, refresh it, then use it, and I manage to make good bread.
2. Prepare the ingredients
You will often find percentages similar to the one below (based on the amount of flour) for a basic loaf of bread:
- Bread flour (100%) or a mixture of bread flour (60% to 80%) and whole wheat flour (40% to 20%).
- Water (65 to 80%): the more water you add, the harder it will be to work the dough, so not necessarily suitable for a first try. I use filtered water in all my recipes.
- Sourdough starter (20 to 35%): the more starter there is, the faster the dough will rise, but the fermentation process takes time; we don’t always want to rush things to get a good result.
- Salt (2 to 5%): important, always include it.
For this recipe, we will use 300 g of flour
(it’s frequently used and yields a loaf of just over 500 g)

If your goal is to perfect your bread making, I would say to take one recipe and stick with it until you master your technique. Then have fun with flours, grains, and mix-ins.
I’ll explain how to make this bread, which is actually quite small, so it’s perfect for practicing.
3. First mix and autolyse
Autolyse is optional: in a bowl, mix the flour and water, you can use a wooden spoon and then your hands. Mix just enough so that all the flour is hydrated. Then let it rest for about 20 minutes.

Autolyse involves adding water and flour initially so that the enzymes present in the flour are activated and start breaking down the starches and proteins. This method was developed by Mr. Raymond Calvel and helps improve the dough’s extensibility and gluten formation. Additionally, it reduces kneading time, enhances flavor, volume, and shelf life of the bread, and so on. After autolysis, the dough is smooth and rested.
You can go up to 2 hours of autolyse if you place the mixture directly in the refrigerator. The goal is to find the right balance for your dough because if it rests too long, at any point in the recipe, the dough will collapse and become « overproofed, » meaning it will be over-fermented. It’s a bit like sourdough; you want it at peak activity, not after it has collapsed.
If you skip the autolyse, the dough will be sticky and difficult to mix. This is due to the salt: salt tightens the gluten and decreases enzymatic activity, reducing the dough’s ability to relax and properly absorb water. When salt is added too early, it therefore makes the dough harder to work with.
A downside of autolyse is if you are making several loaves using large quantities of ingredients. It has been reported that it is more difficult to incorporate the starter and salt by hand after autolyse in this case.
4. Finishing the mixture of ingredients
After autolyse, add 60 of sourdough starter and 3 g of salt. Knead well to mix everything. Let rest for 10-20 minutes at room temperature.

Alternative to steps 3 and 4: mix everything together all at once, knead well to fully incorporate the ingredients, then let rest for 10 minutes at room temperature.
NOTE
- I do this by hand and not with a stand mixer. We want to mix the ingredients well, but we don’t want to tear the dough because the goal is to develop a gluten network. We incorporate it gently and softly.
- Always cover the dough while it rests to prevent a hard layer from forming on its surface: use a damp towel or plastic wrap. I prefer to use plastic food wrap.
5. Kneading stage (optional but recommended) followed by the first fermentation
The purpose of kneading is to strengthen the dough’s gluten network. After kneading, the dough is left to rest until it doubles in size.
ADVICE
- Put a very small amount of water on your hands before kneading to prevent the dough from sticking.
- Do not overwork the dough.
- Touch the dough as little and for as short a time as possible; work it quickly, efficiently, and not too much.
There are several methods for kneading the dough:
- The simple kneading method: knead with the heel of your hand, lifting and pushing the dough arbitrarily until all the dough is well mixed and a smooth surface is achieved. Repeat this method 2 to 4 times, resting for 2 to 3 minutes between each kneading, for a total of about 15 minutes.
- The ‘stretch and fold‘ method, that you see a lot, can be done directly in the bowl: imagine four sides, take the dough from one side, stretch it and fold it over onto the opposite side. Rotate the bowl and repeat, doing this four times in total, once for each side, until all of the dough has been stretched and folded. Do this method four times in total, leaving 30 minutes of rest between each kneading, for a total of 2 hours.

You can find an illustration of this method, by clicking on this link to the bread recipe.
- The ‘slap and fold‘ method on a flat surface, not in the bowl: take the dough with both hands, slap it onto the countertop, pull it, and fold it over itself. Turn it clockwise and repeat, imagining four sides of the dough. Repeat until the dough has a smooth surface. Do this method once until you achieve a smooth surface.
- The ‘scoop and stretch‘ method, also known as ‘coil fold‘: lift from underneath and stretch upwards, the dough folds inward and underneath, this can be done directly in the bowl. Repeat this method 2 to 4 times with 2 to 3 minutes of rest between each kneading for a total of about 15 minutes.
My method: simply knead by hand twice with a 2-minute rest in between, then do the « stretch and fold » 4 times over two hours with 30-minute rests between each kneading. It takes a total of 2 hours and gives me a good result in my warm kitchen.


How can you tell if you’ve kneaded it properly?
The times I have given you above are only indicative; you may need to knead longer or add an extra step.
We want a smooth dough that starts to hold together a bit, where we can begin to see some elasticity. There is a test called the windowpane test (or membrane test): gently stretch the dough (either by taking a small piece or from a corner of the dough ball) until it reaches a thin layer through which you can see without the dough breaking.
If the dough can be stretched without tearing, it has a good gluten structure and the fermentation is optimal. If it tears easily, it needs to ferment longer because the gluten network is not yet well developed. Some use this test as a guide, while others recommend not doing it to avoid stretching the gluten network and altering the dough.

In any case, we don’t want to knead too much because the dough will rise again in the next step.
After kneading the dough, let it rest until it doubles in size, either at room temperature or in the refrigerator (long fermentation). This will take several hours. This is the first fermentation or bulk fermentation. I always do this step at room temperature.
After this step, it is possible to perform the poke test or the finger test (finger test or poke test), which I discuss further in this article.
6. Preshaping
This step helps to strengthen the gluten network and start shaping the dough. This is when you can divide the dough if you wish, and this is also when additions are incorporated (for example, chocolate chips, sugar, olives, seeds…).
Flour the work surface and put a little water on a round dough scraper. Gently pour and push the dough out of the bowl onto the floured work surface. If all goes well and the dough has fermented properly, it should come off easily.
For a round loaf, we call it a boule, and for a long loaf, we call it a bâtard.
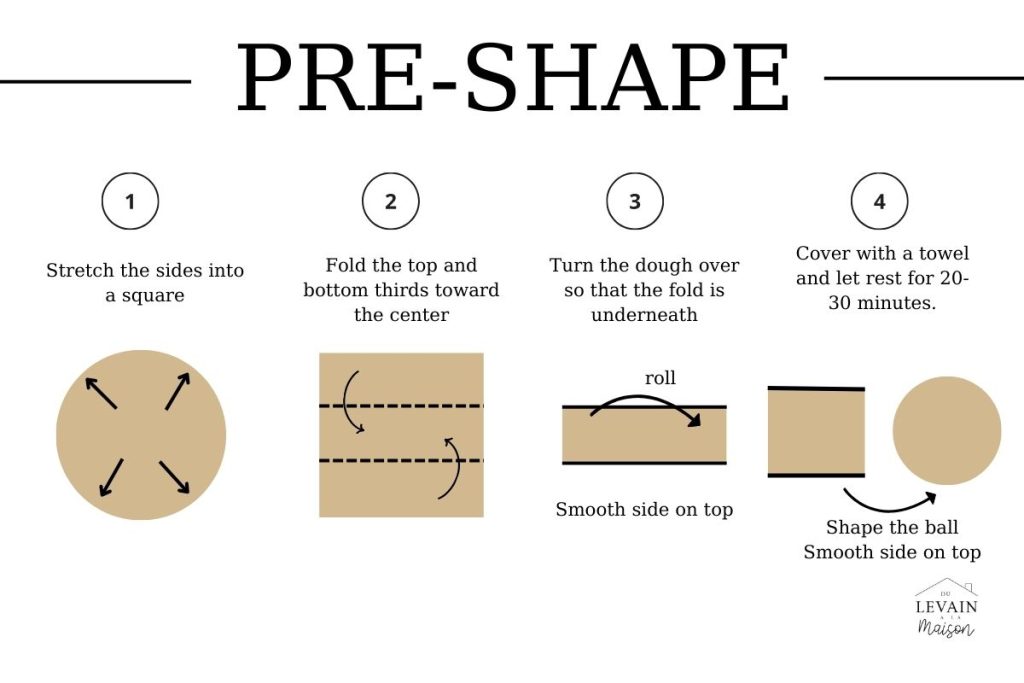
With your fingertips, spread the dough into a square (1), then fold the dough over itself in thirds. Take the top third and then the bottom third and fold them over each other in the center (2). Next, roll the dough, then form a ball by turning the dough on the work surface. You will start to have a smooth ball. Place the smooth side up and the folded side down. Using a bench scraper, lift the dough from the work surface, lightly flour it, and put the ball back down. Flour the top of the dough and cover it with a kitchen towel.
Let it rest for 15 to 30 minutes.
If you don’t have the time, it is possible to complete this step by creating more tension (as explained) below and then placing the dough directly into the banneton. In a way, you are combining the pre-shaping and shaping steps into one. I have done this before and got a good loaf.
There are many different methods for the pre-shaping and shaping steps. I will explain one to you, but for your information, another popular method is to flip the dough onto the work surface and use a bench scraper to create tension and form a ball (pre-shape). Let it rest, then turn the ball, stretch it into a square, and fold it in various ways to form a boule or a bâtard.
7. Final shaping
Turn the dough so that the top surface is on the work surface, flour it before putting it back down. There are several ways to go about shaping the dough; I will provide one.
For a ball, stretch the dough into a square and then fold the dough onto itself towards the center, forming a ball that you will turn onto the work surface. You end up with the smooth side facing up. Then apply a bit of tension by pushing the dough in a circular motion on the work surface. Push and roll the dough in a circle to create this tension.

For a bâtard or a loaf that will be baked in a rectangular mold, we fold the top over itself by a few centimeters, twice, then fold the right and left sides to meet in the center. With this square shape obtained, we roll the dough over itself to get a burrito shape. If more tension is needed, a bench scraper can be used to push the dough while rolling it on the work surface. This is what I do and explain in the pre-shaping before rolling the dough into a round.
It’s important not to tear the dough by creating too much tension. This comes with practice.
8. Place the dough in a proofing basket and let it undergo the final proofing.
A rattan banneton is ideal. It can be covered with a thin towel, preferably linen, but otherwise you can use a cotton towel or a kitchen cloth. If you want the marks of the banneton on the dough, do not use cotton at the bottom of the banneton. I do not recommend silicone bannetons, as they retain moisture between the dish and the dough. If you don’t have a banneton, you can use a bowl lined with a kitchen cloth.


In any case, it is necessary to lightly flour the banneton or towel using some flour. Gluten-free flour is preferred (buckwheat, for example), but as a last resort, you can use wheat flour.
Place the dough with the smooth side down in the bottom of the banneton. Then cover it with plastic wrap or a cloth.
From there, there are several options:
- Either let it rest at room temperature for 2 to 4 hours.
- Or place the proofing basket in the refrigerator for 12 to 16 hours. That’s what I usually do; I leave it in the fridge overnight and bake the bread the next morning.
- Or let it rest at room temperature for about 2 hours and then place it in the refrigerator for 10 to 14 hours.

How can you tell if the dough is ready for baking?
There are no precise criteria because the way the dough rises depends on a lot of factors (temperature, starter, flour, etc.). With practice, you’ll get an idea of your own timeline and how long it takes you.
However, there are signs to watch for, such as:
- The dough has increased in volume (but not too much, otherwise the gluten network can no longer hold the gas and the dough will collapse, resulting in bread that is too dense).
- The dough (according to the finger test):
- Not rested enough: when you press on the dough, it is very dense and firm.
- Well rested: when you touch the dough, you can feel the air; it is firm but airy, and the indentation slowly springs back but not completely.
- Over-rested: when you press on the dough, it is too soft and not firm at all, and the indentation remains in the dough.
- This is a general idea, and the best way is to learn through experience.
9. Pre-heat the oven and prepare the dutch oven
Preheat the oven and the dish to be used directly in the oven for 30-60 minutes at 500°F (260°C).
It is best to use an enameled cast iron pot with a lid, also known as a Dutch oven. A bread oven can also be used.
10. Score the dough
When the bread bakes, the water in the dough evaporates, and scoring the bread allows an opening where the steam can escape. It is therefore essential to carry out this step. This is also referred to as lamage (or scarification) in French.

Once the oven is preheated, I prepare a sheet of parchment paper that I cut and on which I place the dough after turning the banneton over. Then I brush the banneton to remove the excess flour inside.

Next, dust the dough with rice flour, for example, or you can use wheat flour. We want to make a big score in the bread that will be quite deep. I use a razor blade; it’s a bit tougher with a knife to get a good score. Make this big score at a 45° angle with the razor, quickly and precisely in one go.
Small remarks
- The bread is ready for baking with this scoring mark, but you can also make small, shallower marks to decorate the bread.
- It is easier to score dough that has been refrigerated and is cold rather than dough that has fermented at room temperature.
- If you realize that your dough has over-fermented, it is best not to score it with a razor so that it doesn’t collapse further. Another option is to use it for focaccia or pizza.
- There are countless ways to score your dough, and none of them are wrong: a cross, lines, a circle, a wheat ear, etc.
- You can also use a stencil and sprinkle colored powders or cocoa on top of your dough.
11. Bake the dough
Place the dough while holding the parchment paper in the preheated dish. Close the dish and bake for 15-20 minutes at 500°F (260°C), then lower the temperature to 450°F (232°C), remove the lid, and bake for an additional 10 to 15 minutes; we want a crispy bread with a golden color.
I, in general, don’t have a lot of time, so I’ll tell you what I do, and overall (for a basic bread) it works well for me. I put the bread in the enameled Dutch oven (previously preheated), then I pour some water between the parchment paper and the pot, and close the lid. I bake it at 450°F, or about 230°C, for 20 minutes. Then I remove the lid and bake for another 10 to 15 minutes.
I recommend taking it slowly with the cooking times and seeing what works well depending on how your oven heats and the size of the dough.
Closing the lid during the first phase of cooking will allow steam to build up in the oven to properly cook the dough.

You can cut the parchment paper or not (but there may be marks on the bread)
You can also use a metal baking sheet, a cast iron pan, a pizza stone… And on the lower rack of the oven, you will place a dish filled with water to create steam in the oven. Indeed, this steam allows the bread to continue to rise in the oven and is essential. You can use either ice or boiling water.
Another option is to use a spray bottle and mist the dough or spray the inside of the oven. Some ovens have a steam feature. A small note: if you want to add seeds or grains to your bread, you can use a water spray on the surface and then roll the top of the bread on a plate full of seeds, for example. Press down slightly to make them stick well, then score the bread.
There are other techniques, such as using a loaf pan and placing another one on top to ‘close’ it as a lid.
If the dough contains a lot of sugar, eggs, or butter, there is no need to cook the pastries with steam.
TIPS
- Some people prefer to place a rack (« a trivet ») at the bottom of the dish so that the bottom of the loaf of bread doesn’t get too hard.
- Sometimes I put a little water in my dish before closing it to help create more steam (between the dish and the parchment paper).

When the dough is baked, enzymatic reactions are accelerated by the heat, leading to a rapid formation of carbon dioxide. The enzymes on the surface of the bread increase their activity and transform the starch into dextrins, which contribute to the browning of the crust at the end of baking. The maximum internal temperature of the bread is 194-212 °F (90-100 °C); once reached, the crust begins to brown.
At 212-350°F (100-177°C), the Maillard reaction begins and allows the creation of numerous acids that give sourdough its full flavor. It is a caramelization of sugars on the surface that is responsible for the golden color of the crust. If the dough is fermented for too long, there will not be enough sugars available, and as a result, the crust will not be able to turn golden. A pale loaf coming out of the oven can therefore indicate over-fermentation. This will also happen if there is no water steam during the first phase of baking (covered container). It is therefore essential to properly close your container or create water steam in the oven for this first phase of baking.
12. Let cool before slicing the bread for tasting
It is best to wait until the bread has completely cooled before cutting it, otherwise the dough will not have the desired texture. This is because the water in the dough has not yet fully evaporated. Additionally, if you cut the bread while it is hot, the water will escape too quickly and the bread will go stale faster.
After taking the dish out of the oven, place the bread on a rack to cool. This step is referred to as « unmolding » and « resting ».
For wheat bread, it is recommended to wait 1 to 2 hours before cutting. For rye bread, wait 12 to 24 hours.

Bread keeps best in a cloth bread bag or an airtight plastic bag.
To conclude …
How to evaluate your loaf of bread? We want:
– A loaf of bread that cracks nicely
– A good caramelization on top, a beautiful golden color
– A light loaf
– A crumb with many small air bubbles spread throughout
– A nice smell
What could go wrong?
– Not fermenting enough and letting the dough rest: the bread will be dense, may have few or huge holes, and will have a sticky texture
– The starter was too weak: the bread may come out of the oven flat, not rise, be dense, and have no bubbles
– Over-fermenting and letting it rest too long: the bread may come out of the oven flat, dense, and sticky
– If you forget to score the bread: the bread may burst in any direction
I’ve already mentioned this, but I’ll repeat it: I am by no means a professional, I am self-taught and I learn what is useful for cooking at home for my family.
On my blog, you will find several bread recipes, but start with this one if you have never made sourdough bread before.
My timeline to get an idea
Other articles you migt be interested in
5 tools to use for making your sourdough bread at home


