
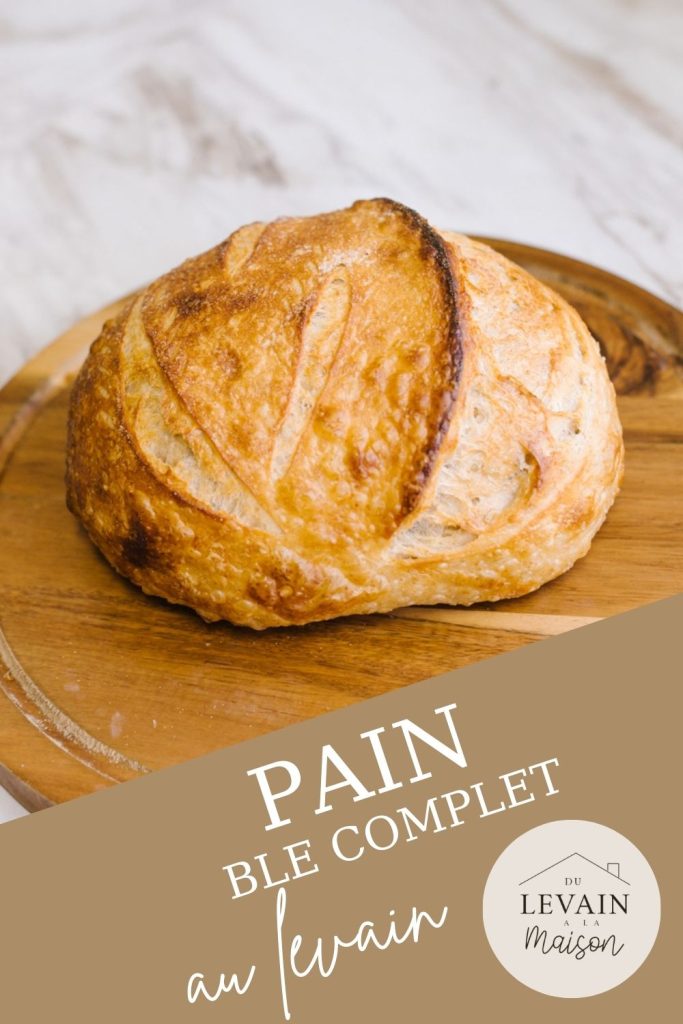
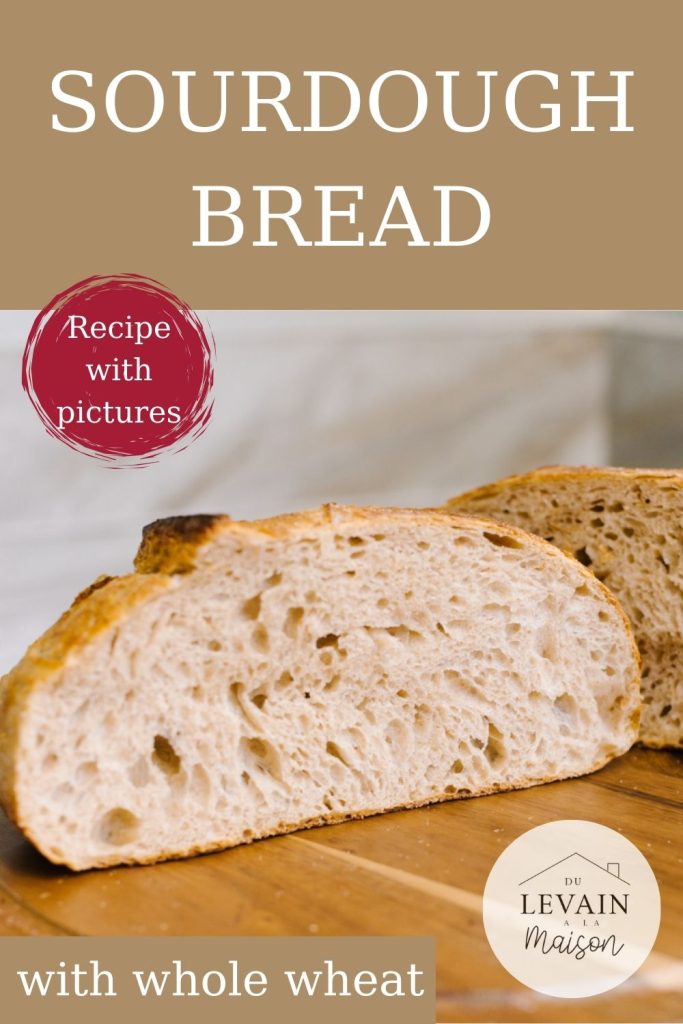
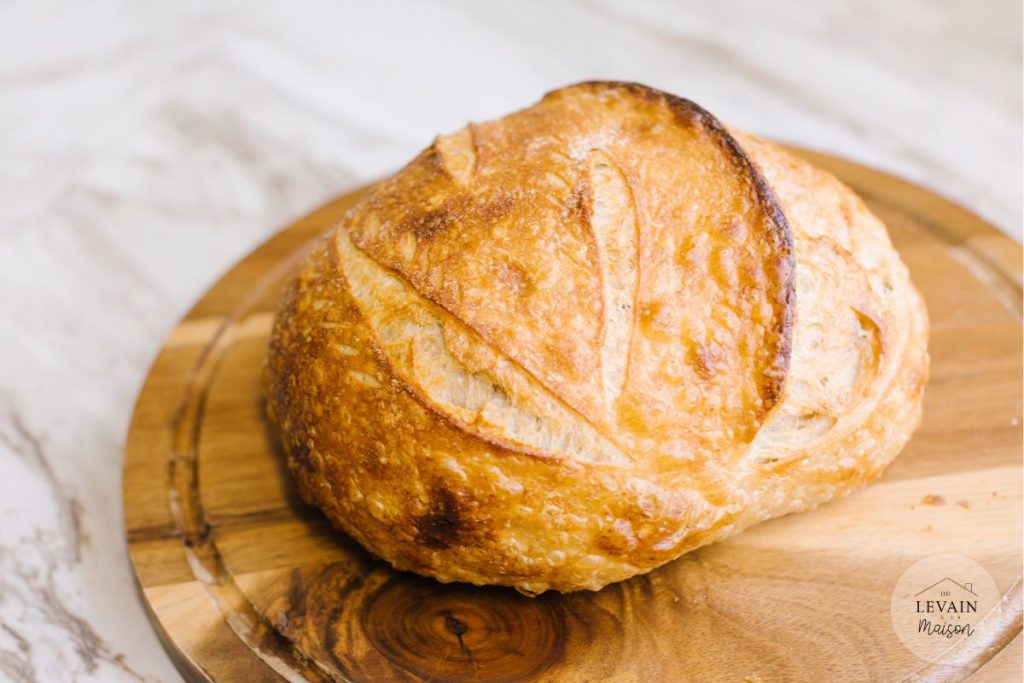
I am sharing my sourdough bread recipe in detail, using bread flour and whole wheat flour. You get a nice, crusty loaf of bread. I encourage you to read the complete guide to making your own sourdough bread (English version) at least once before diving into this recipe.


I recommend that you read my article on my top 5 useful tools for making sourdough bread.
Ingredients
TIPS
- If this is your first time making sourdough bread at home, don’t stress; with sourdough, you really learn by trying and making mistakes—that’s part of the learning process.
- This bread contains barley, wheat, and whole wheat because my bread flour contains barley and wheat, and then I added whole wheat flour. If your bread flour contains a different mix, you can still follow this recipe as a reference.
- Use active sourdough, as it’s the starter that allows the dough to rise. It should be active at its peak or just after the peak.
- If you doubled the quantities to make two loaves, you’ll need to divide the dough at the shaping stage.
- Once you master the technique, vary the additions: chocolate chips, nuts, dried fruit…
- You can freeze this bread to have some on hand for longer.
- Otherwise, it keeps well in a cotton bag or wrapped in a kitchen cloth.
- The longer version of the recipe will obviously give a better result.
The steps – the recipe in pictures for sourdough bread, made with bread flour and whole wheat flour
Autolyse: mix the flours and water, then let rest for 20 minutes.
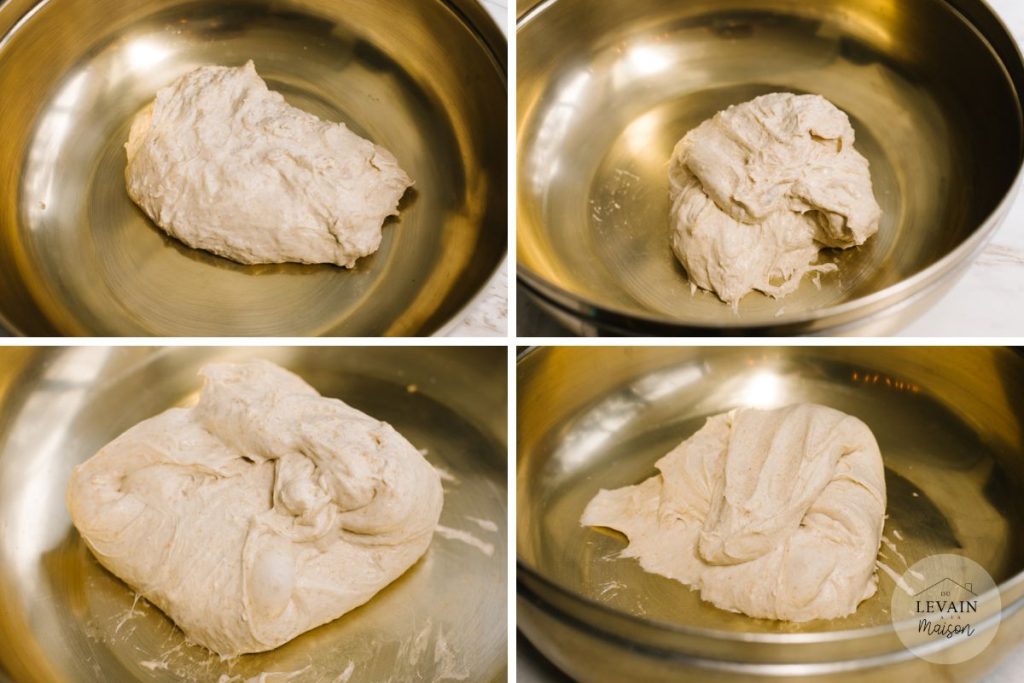
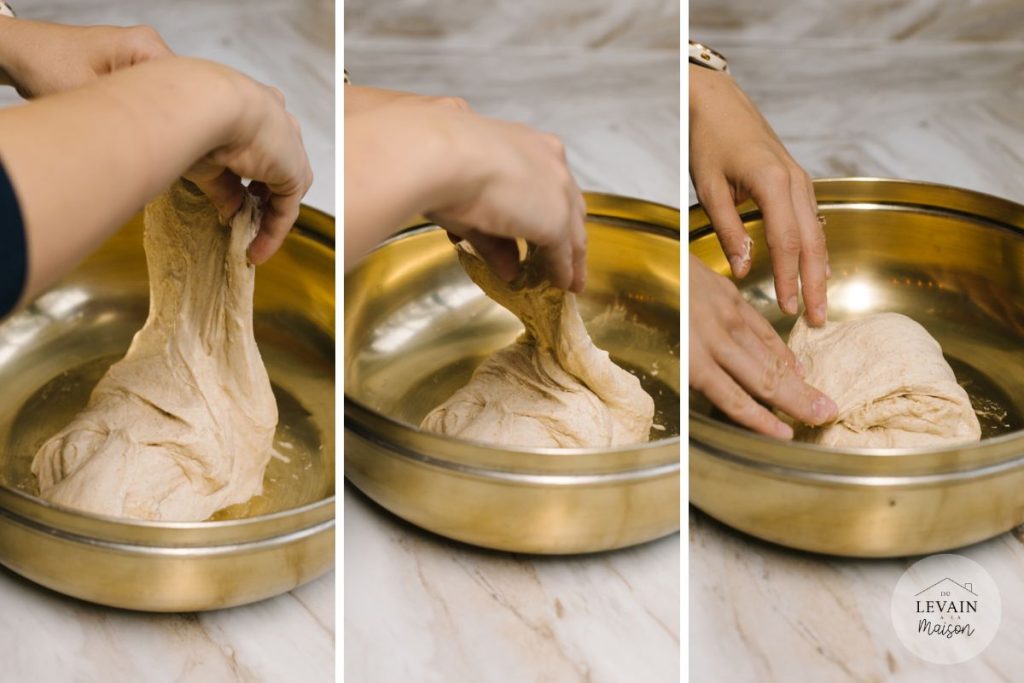
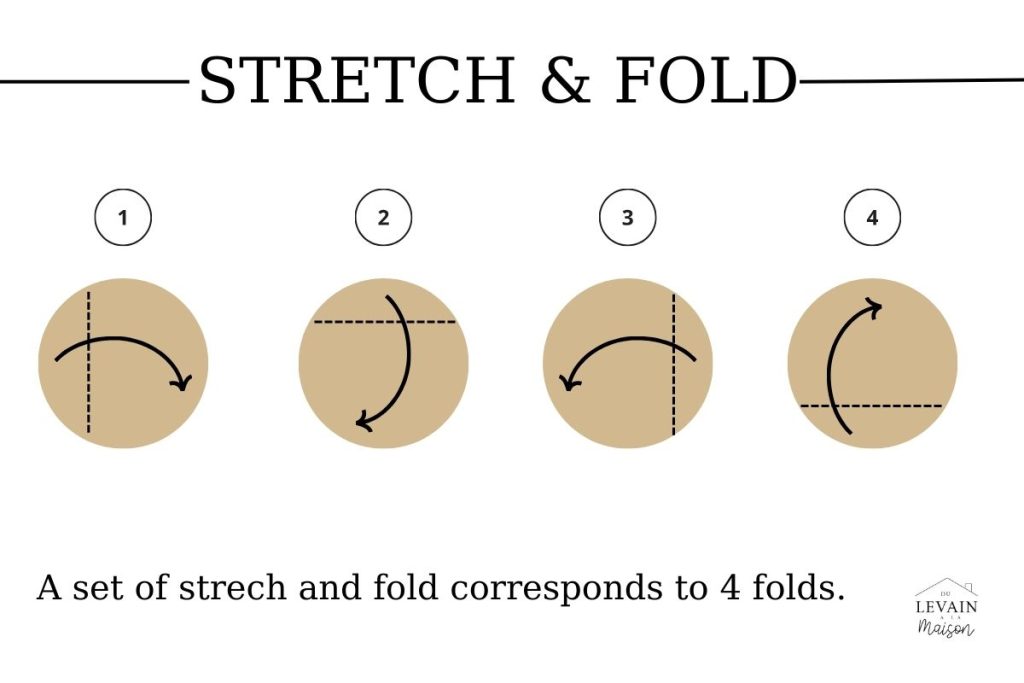
Add the salt and starter, then knead by hand to combine well. Let rest for 20 minutes. Perform a ‘stretch and fold’ kneading: 4 times with 30 minutes of rest between each kneading for a total of 2 hours.
When doing a « stretch and fold » kneading: place your dough on the work surface and imagine it has 4 sides. You will stretch the dough from one side and fold it over the ball. Do this for all 4 sides of the dough. It doesn’t need to be perfect. Once you’ve stretched and folded the dough on all 4 sides, that constitutes one « stretch and fold » cycle. You will do this, then let it rest for 30 minutes and repeat. To complete these 4 folds, a total of 4 times. You will notice a big change in the appearance and elasticity of the dough.

First fermentation: cover and let rest at room temperature until the dough doubles in size. This is also called bulk fermentation.
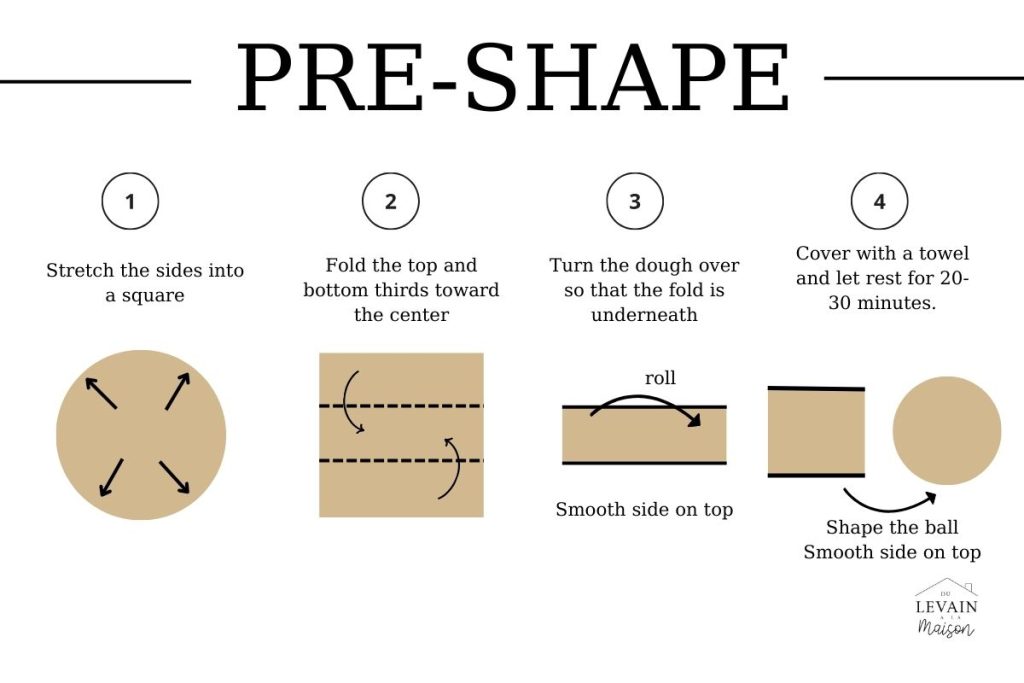
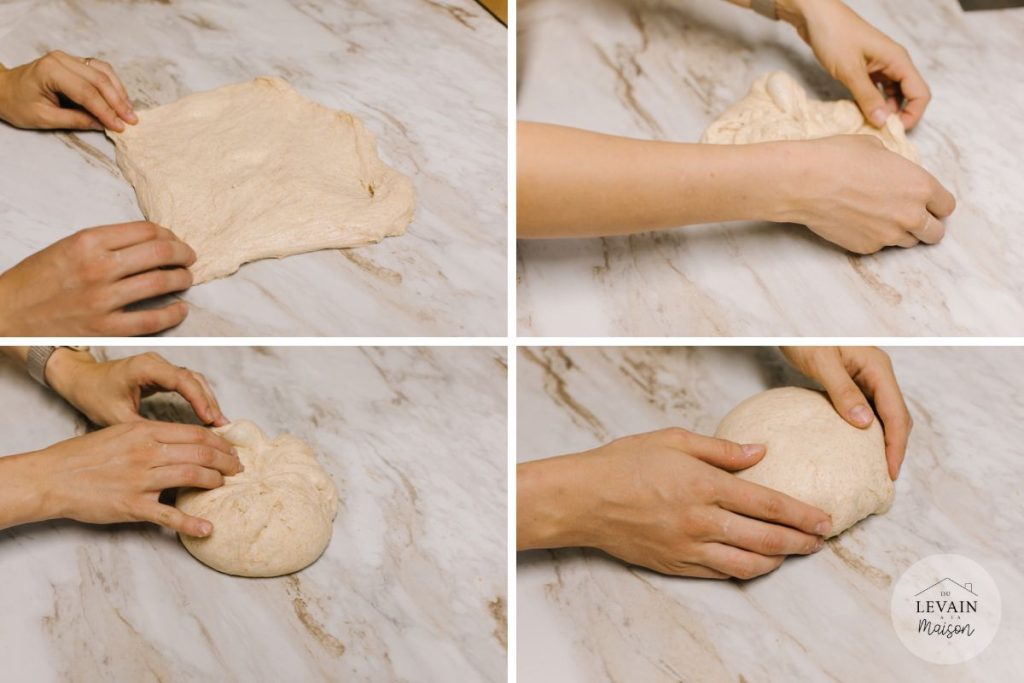
Pre-shape: gently spread the dough with your fingers to form a square. Pull the top third of the dough and fold it over the middle third. Then pull the bottom third and fold it over the middle. Then turn the dough so that the fold is underneath (in contact with the work surface) and the smooth side is on top (facing you). Cover with a towel and let rest for 20-30 minutes.
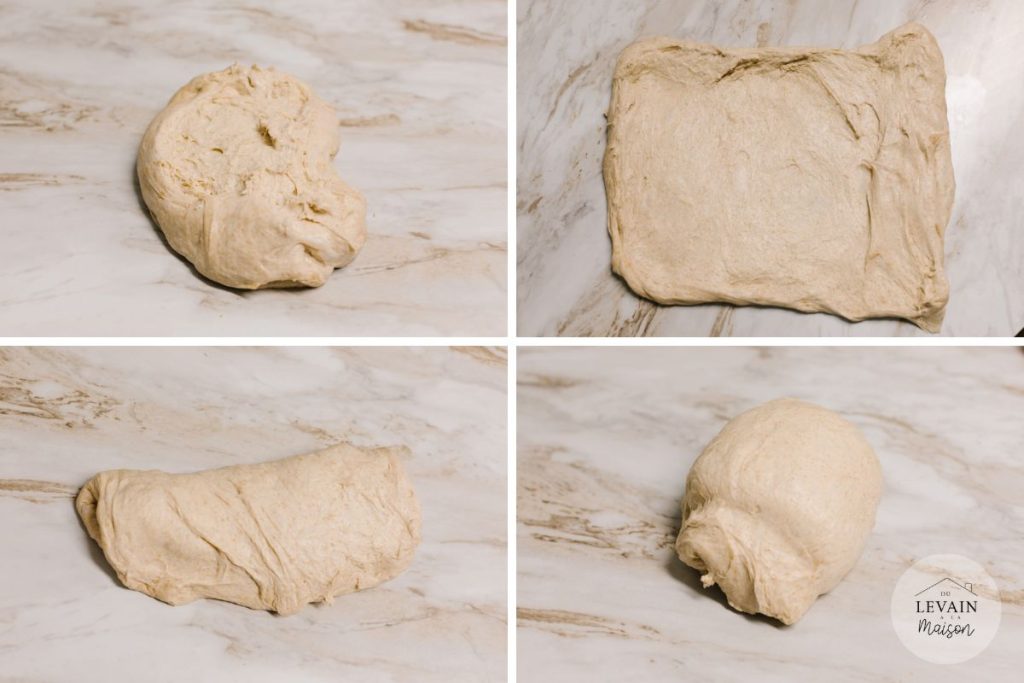
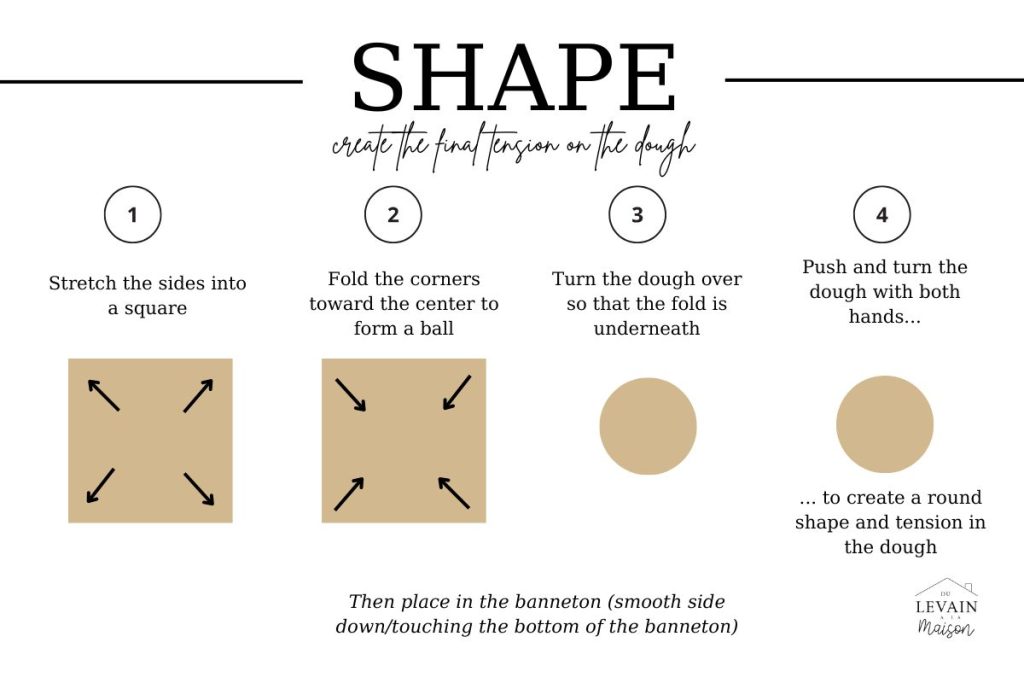
Shape: create the final tension in the dough. Stretch the dough into a square, then fold the four corners to the center. Turn the fold over onto the work surface, then push and turn the dough with both hands to create a round shape and tension in the dough (see picture recipe). Stop before the dough breaks, you want a smooth surface without applying too much pressure to the point where the dough cracks. You can use a dough scraper to push the dough and create tension, or simply lift it gently off the work surface.
Note: to shape a bâtard rather than a round loaf, fold the square into a rectangle by bringing two sides to the center, then roll the rectangle into a cylinder.
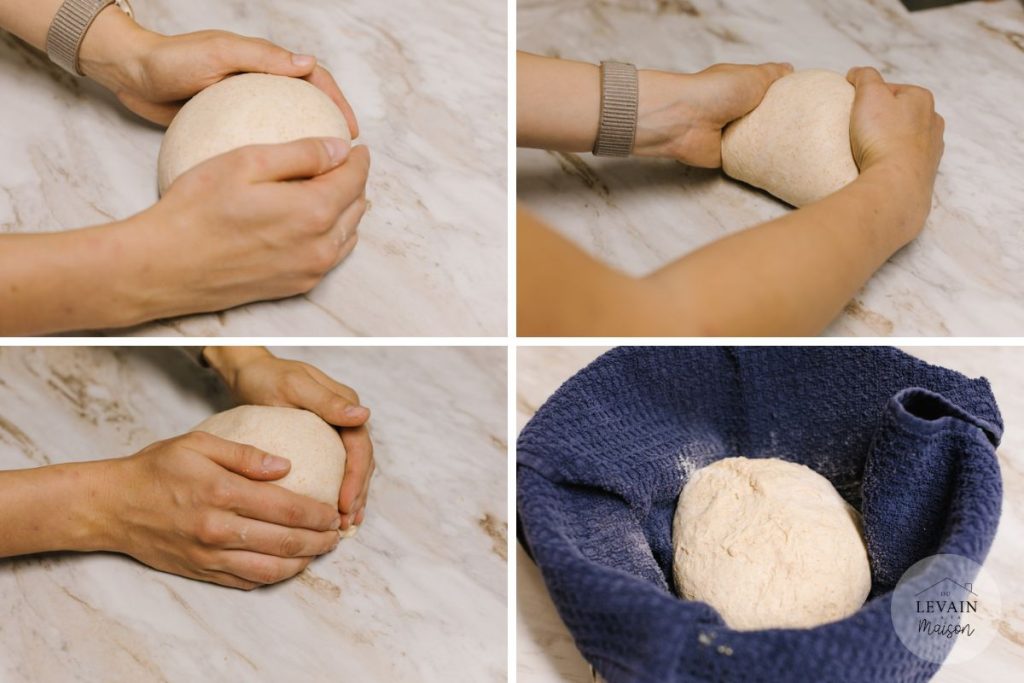
Flour the wicker proofing basket (with or without the cloth, depending on whether you want the basket’s marks to appear on the dough).
Tip
Without a banneton, use a mixing bowl covered with a kitchen towel. Note that the size is important and will affect the final shape of the bread.
Place the dough ball in the banneton, smooth side down. You can pinch the dough if needed to properly seal the fold (on the side facing us, not smooth). This is also referred to as the seam (where the edges of the dough meet), which is therefore facing us.
Second fermentation: cover and place the banneton in the refrigerator overnight (12 to 15 hours). This is the second, slow fermentation, which helps to develop the flavor of the bread.
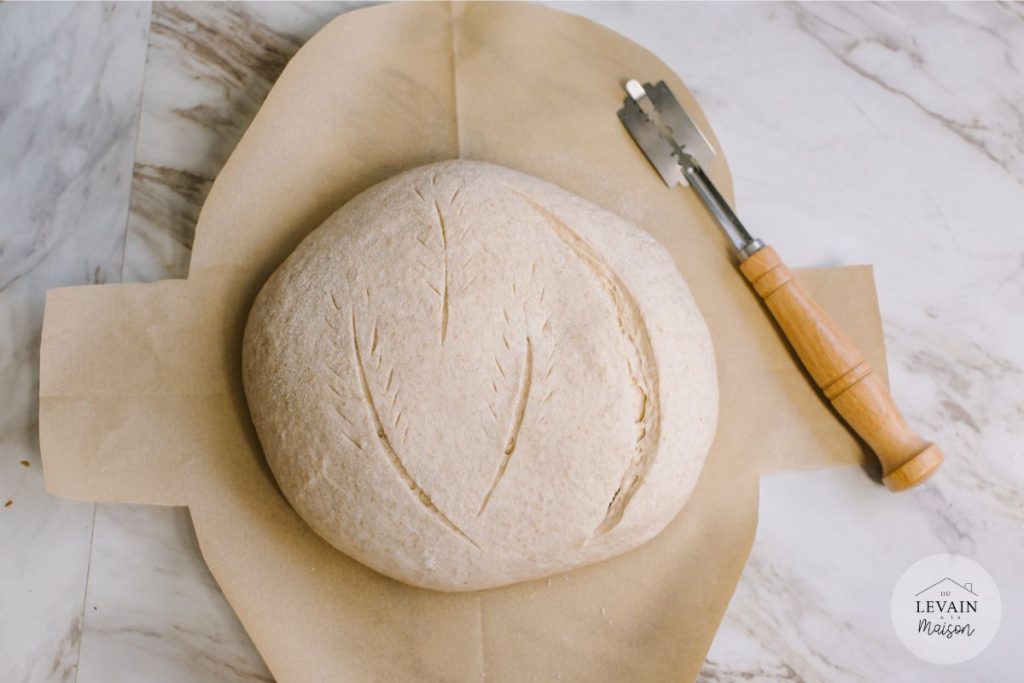
The next day, prepare for baking: turn the banneton onto a sheet of parchment paper cut to size. I fold a sheet of parchment paper in quarters and cut out a rounded shape with a ‘handle’ (see images below).

Preheat the oven with the bread cloche (or another pan as explained in the full guide) to 450°F or 230°C for 30-45 minutes.
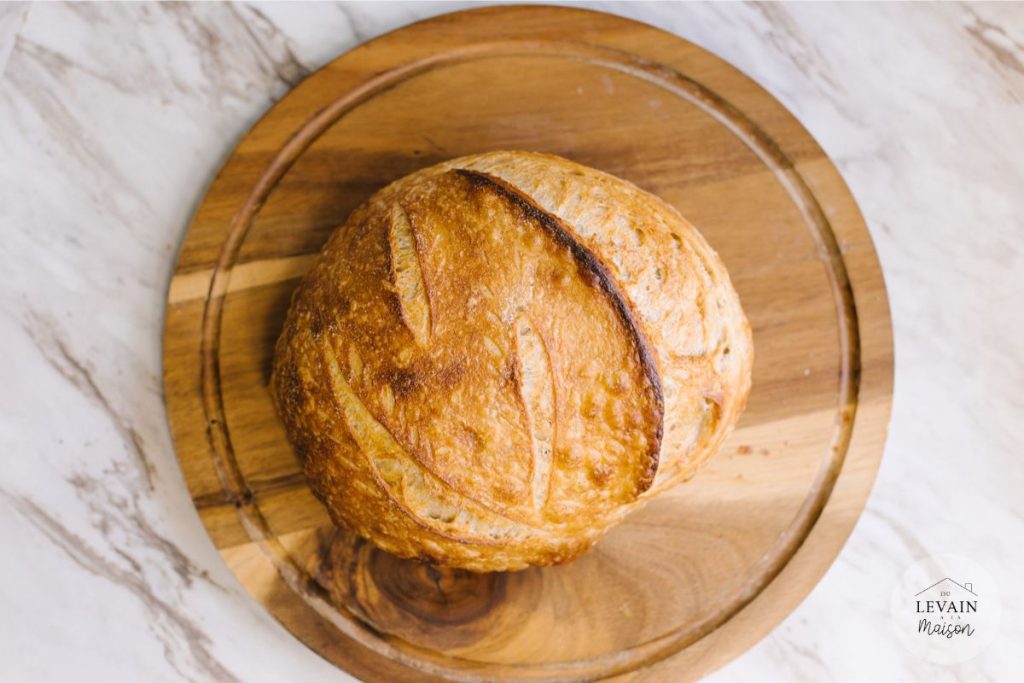
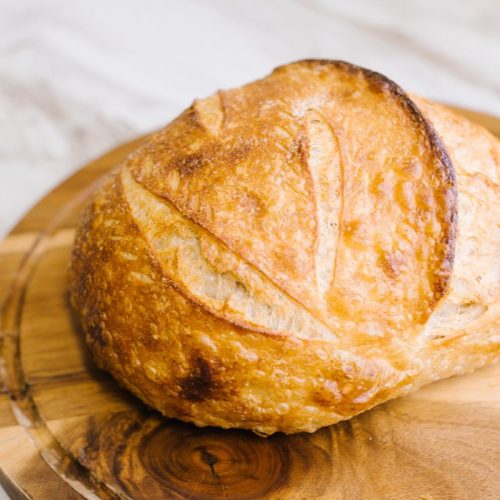
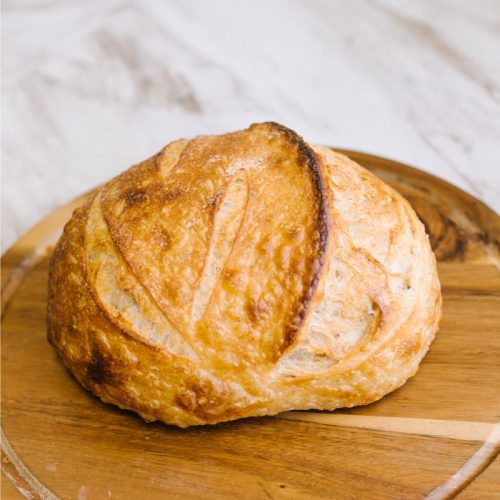
Score the bread: flour the top of the dough and make a 45° deep cut with a razor blade. You can also make small, shallower designs. You can use bread flour, or to get a more visible scoring, you can use gluten-free flour such as brown rice flour.
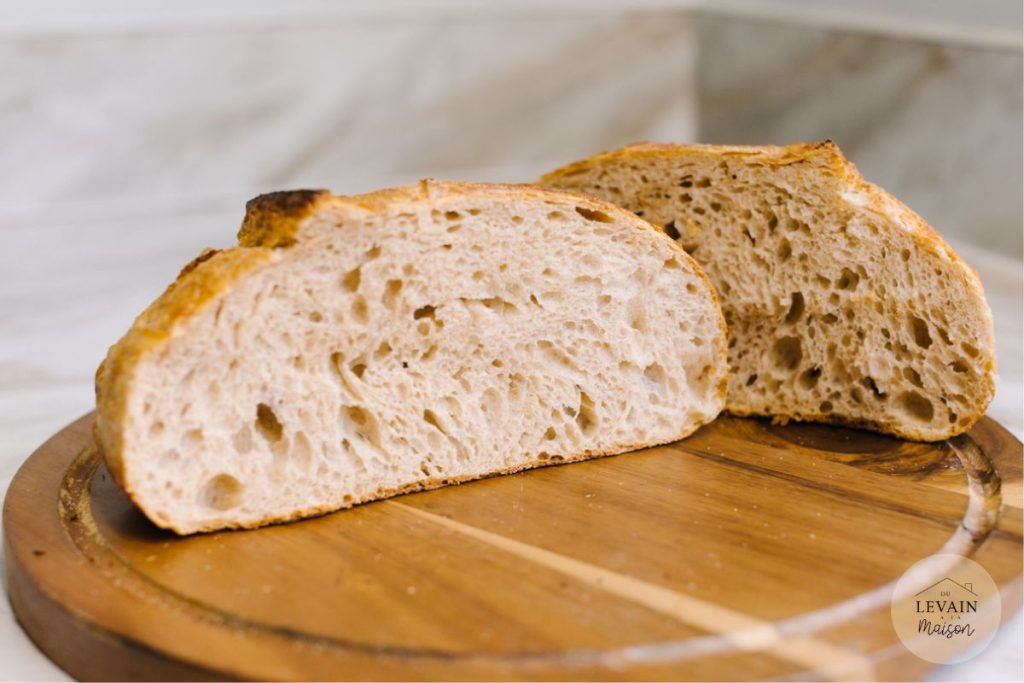
Bake: 20 minutes in the cast-iron pot with the lid on, then 10-15 minutes without the lid, until the bread is golden.
Vous avez testé cette recette ?
Laissez-moi un commentaire en bas de la page et n’hésitez pas à évaluer la recette.
Sourdough bread: bread flour and whole wheat flour
Equipment
- Mixing bowl
- Banneton
- Dough scraper
Ingrédients
- 240 g bread flour
- 60 g whole wheat flour
- 350 ml mineral or filtered water
- 100 g sourdough starter (active)
- 10 g salt
Instructions
Quick version (if you don’t have time)
- Mix all the ingredients and let rest for 20 minutes.240 g bread flour, 60 g whole wheat flour, 350 ml mineral or filtered water, 100 g sourdough starter (active), 10 g salt
- Knead 4-5 times with 2 minutes of rest between each kneading.
- Cover and let rise at room temperature until the dough doubles in size.
- Preheat the oven with the bread cloche (or another mold) to 500°F or 260°C for 30-45 minutes.
- Shaping: create the final tension in the dough. Stretch the dough into a square, then fold the four corners into the center. Turn the fold onto the work surface, then push and turn the dough with both hands to create a round shape and tension in the dough (see recipe images). Stop before the dough breaks; you want a smooth surface but not apply too much pressure to the point where the dough cracks.
- Note: To shape a bâtard rather than a boule, fold the square into a rectangle by bringing two sides toward the center, then roll the rectangle into a log.
- Scoring the bread: Flour the top of the dough and make a 45° deep cut with a razor blade. You can place the bread in a wicker banneton for a few minutes in the freezer to make it easier to create the razor cuts.
- Baking: 20 minutes with the lid on, then 10-15 minutes without the lid, until the bread is golden brown.
- Let cool completely before slicing.
Full version (best result)
- Autolyse: mix the flours and water, then let it rest for 20 minutes.240 g bread flour, 60 g whole wheat flour, 350 ml mineral or filtered water
- Add the salt and starter, then knead by hand to incorporate well.10 g salt, 100 g sourdough starter (active)
- Let rest for 20 minutes.
- Perform a « stretch and fold » kneading: 4 times, with 30 minutes of rest between each kneading for a total of 2 hours.
- Cover and let rest at room temperature until the dough doubles in size.
- Pre-shape: gently stretch the dough with your fingers to form a square. Pull the top third of the dough and fold it over the middle third. Then pull the bottom third and fold it over the middle. Then turn the dough over so that the fold is underneath (in contact with the work surface) and the smooth side is on top (facing you). Cover with a towel and let rest for 20-30 minutes.
- Shaping: create the final tension on the dough. Stretch the dough into a square and then fold the four corners toward the center. Turn the fold onto the work surface, then push and rotate the dough with both hands to create a round shape and tension in the dough (see the recipe with images). Stop before the dough breaks; you want a smooth surface without applying so much pressure that the dough cracks.
- Note: to form a bâtard instead of a round loaf, fold the square into a rectangle by bringing two sides to the center, then roll the rectangle into a cylinder.
- Final rest: cover and leave on the work surface for 2 to 3 hours at room temperature (optional).
- Flour the wicker banneton (with or without the cloth, depending on whether you want to see the marks of the banneton on the dough).
- Note: without a banneton, use a bowl lined with a kitchen towel. Keep in mind that the size is important and will affect the final shape of the bread.
- Place the ball of dough in the banneton, smooth side down. You can pinch the dough if needed to properly seal the fold (on the side facing you, not the smooth side).
- Cover and place the banneton in the refrigerator overnight (12 to 15 hours).
- Turn the banneton over onto a sheet of cut parchment paper (see recipe image).
- Preheat the oven with a Dutch oven (or other baking dish) to 500°F or 260°C for 30-45 minutes.
- Score the bread: dust the top of the dough with flour and make a 45° deep slash with a razor blade. You can also make shallower decorative cuts.
- Bake: 20 minutes with the lid on, then 10-15 minutes without the lid, until the bread is golden brown.
- Let cool completely before slicing.
Other articles you might be interested in
Je vous explique en détail ma recette de pain au levain, en utilisant de la farine de pain et de la farine de blé complet. On obtient une jolie miche de pain croustillante. Je vous invite à lire, au moins une fois, le guide complet pour réaliser son pain au levain avant de vous lancer dans cette recette.
Je vous recommande de lire mon article sur mon top 5 des ustensiles utiles pour faire son pain au levain.
Les ingrédients
CONSEILS
- Si c’est la première fois que vous faites un pain à la maison au levain, ne stressez pas, avec le levain, on apprend vraiment en essayant et en faisant des erreurs, ça fait partie de l’apprentissage.
- Ce pain contient de l’orge, du blé et du blé complet parce que ma farine de pain contient de l’orge et du blé puis j’ai ajouté de la farine de blé complet, si votre farine pour pain contient un autre mélange vous pouvez tout de même vous référencez à cette recette.
- Utilisez du levain actif, c’est le levain qui permet la pousse de la pâte. Il doit être actif à pic ou un peu après le pic.
- Si vous avez fait les quantités doubles pour préparer deux pains, c’est au moment de la pré-forme qu’il vous faut diviser la pâte.
- Une fois que vous maitrisez la technique, varier les inclusions : pépites de chocolat, noix, fruits secs…
- Vous pouvez mettre ce pain au congélateur pour en avoir sous la main plus longtemps.
- Ou sinon, il se garde bien dans un sac en cotton ou enroulé dans un torchon de cuisine.
- La version longue de la recette donnera un meilleur rendu bien évidemment.
Les étapes – la recette en image du pain au levain, à la farine de pain et farine de blé complet
Autolyse : mélanger les farines et l’eau puis laisser reposer 20 minutes.
Ajouter le sel et le levain puis pétrir à la main pour bien incorporer. Laisser reposer 20 minutes. Réaliser un pétrissage « stretch and fold » (tire et plie) : 4 fois avec 30 minutes de repos entre chaque pétrissage pour un total de 2 heures.
Lorsque vous faites un pétrissage « tire et plie » : placer votre pâte sur le plan de travail, imaginez 4 côtés. Vous allez tirer la pâte d’un côté et la replier sur la boule. Vous faites cela des 4 côtés de la pâte. Cela n’a pas besoin d’être parfait. Une fois que vous avez tiré et replié la pâte des 4 côtés, cela constitue un (cycle de) « tire et plie ». Vous allez faire cela, puis laisser reposer 30 minutes et recommencer. Pour faire ces 4 plis, un total de 4 fois. Vous allez remarquer un grand changement sur l’aspect et la flexibilité de la pâte.

Première fermentation : couvrir et laisser reposer à température ambiante jusqu’à ce que la pâte double de volume. On parle aussi de pointage.
Pré-forme : étaler la pâte délicatement avec les doigts pour former un carré. Tirer sur le tiers supérieur de la pâte et le replier sur le tiers du milieu. Puis tirer sur le tiers inférieur et le replier sur le milieu. Puis retourner la pâte pour que le plie se retrouve au dessous (au contact du plan de travail) et que le côté lisse se retrouve au dessus (face à soi). Couvrir d’une serviette et laisser reposer 20-30 minutes.

Forme : on crée la tension finale sur le pâte. Etirer la pâte en carré puis replier les quatre coins au centre. Retourner le pli sur le plan de travail puis pousser et tourner la pâte avec les deux mains pour créer une forme ronde et de la tension dans la pâte (voir recette en image). S’arrêter avant que la pâte ne casse, on veut une surface lisse mais pas appliquer trop de pression au point où la pâte craque. Vous pouvez vous aider d’un racloir à pâte pour pousser votre pâte et créer de la tension ou tout simplement la décoller du plan de travail délicatement.
Note : pour former un bâtard plutôt qu’une boule, on replie le carré en rectangle en rejoignant deux côtés vers le centre puis on roule le rectangle en boudin.

Fariner le banneton en osier (avec ou sans le coton, selon que vous voulez voir les marques du banneton ou non sur la pâte).
Conseil
Sans banneton, utiliser un saladier recouvert d’une serviette de cuisine. A savoir que la taille est importante et aura un impact sur la forme finale du pain.
Déposer la boule de pâte dans le banneton, côté lisse en bas. On peut pincer la pâte si besoin pour bien refermer le pli (du côté face à nous, non lisse). On parle aussi de la soudure (là où les bords du pâton se rejoignent) qui est donc face à nous.
Seconde fermentation : couvrir et placer le banneton au réfrigérateur toute la nuit (12 à 15 heures). C’est la seconde fermentation, lente, elle permet notamment de développer la saveur du pain.
Le lendemain, préparer à la cuisson : retourner le banneton sur une feuille de papier sulfurisée coupée. Je plie une feuille de papier sulfurisé en 4 et je découpe une forme arrondie avec un « manche » (voir images ci-dessous).
Préchauffer le four avec la cloche à pain (ou autre moule comme expliqué dans le guide complet) à 450°F ou 230°C pendant 30-45 minutes.
Marquer le pain : fariner le dessus de la pâte et faire une entaille à 45° profonde avec une lame de rasoir. Vous pouvez aussi faire des petits dessins moins profonds. Vous pouvez utiliser de la farine de pain ou pour avoir un marquage bien visible, vous pouvez utiliser de la farine sans gluten telle que la farine de riz brun.
Enfourner : 20 minutes dans la cocotte en fonte avec cloche fermée puis 10-15 minutes sans couvercle. Jusqu’à ce que le pain soit doré.
Vous avez testé cette recette ?
Laissez-moi un commentaire en bas de la page et n’hésitez pas à évaluer la recette.
Pain au levain : farine de pain et blé complet
Ingrédients
- 240 g de farine de pain
- 60 g de farine de blé complet
- 350 ml d'eau minérale ou filtrée
- 100 g de levain (actif)
- 10 g de sel
Instructions
Version rapide (si vous n'avez pas le temps)
- Mélanger tous les ingrédients et laisser reposer 20 minutes.240 g de farine de pain, 60 g de farine de blé complet, 350 ml d'eau, 100 g de levain, 10 g de sel
- Pétrir 4-5 fois avec 2 minutes de repos entre chaque pétrissage.
- Couvrir et laisser reposer à température ambiante jusqu'à ce que la pâte double de volume.
- Préchauffer le four avec la cloche à pain (ou autre moule) à 500 °F ou 260°C pendant 30-45 minutes.
- Forme : on crée la tension finale sur le pâte. Etirer la pâte en carré puis replier les quatre coins au centre. Retourner le pli sur le plan de travail puis pousser et tourner la pâte avec les deux mains pour créer une forme ronde et de la tension dans la pâte (voir recette en image). S'arrêter avant que la pâte ne casse, on veut une surface lisse mais pas appliquer trop de pression au point ou la pâte craque.Note : pour former un bâtard plutôt qu'une boule, on replie le carré en rectangle en rejoignant deux côtés vers le centre puis on roule le rectangle en boudin.
- Marquer le pain : fariner le dessus de la pâte et faire une entaille à 45° profonde avec une lame de rasoir. Vous pouvez mettre le pain dans un banneton en osier quelques minutes au congélateur pour faciliter la création des entailles au rasoir.
- Enfourner : 20 minutes avec cloche fermée puis 10-15 minutes sans couvercle. Jusqu'à ce que le pain soit doré.
- Laisser refroidir complètement avant de découper.
Version complète (meilleur résultat)
- Autolyse : mélanger les farines et l'eau puis laisser reposer 20 minutes.240 g de farine de pain, 60 g de farine de blé complet, 350 ml d'eau
- Ajouter le sel et le levain puis pétrir à la main pour bien incorporer.10 g de sel, 100 g de levain
- Laisser reposer 20 minutes.
- Réaliser un pétrissage "stretch and fold" (tire et plie) : 4 fois avec 30 minutes de repos entre chaque pétrissage pour un total de 2 heures.
- Couvrir et laisser reposer à température ambiante jusqu'à ce que la pâte double de volume.
- Pré-forme : étaler la pâte délicatement avec les doigts pour former un carré. Tirer sur le tiers supérieur de la pâte et le replier sur le tiers du milieu. Puis tirer sur le tiers inférieur et le replier sur le milieu. Puis retourner la pâte pour que le plie se retrouve au dessous (au contact du plan de travail) et que le côté lisse se retrouve au dessus (face à soi). Couvrir d'une serviette et laisser reposer 20-30 minutes.
- Forme : on crée la tension finale sur le pâte. Etirer la pâte en carré puis replier les quatre coins au centre. Retourner le pli sur le plan de travail puis pousser et tourner la pâte avec les deux mains pour créer une forme ronde et de la tension dans la pâte (voir recette en image). S'arrêter avant que la pâte ne casse, on veut une surface lisse mais pas appliquer trop de pression au point ou la pâte craque.Note : pour former un batard plutôt qu'une boule, on replie le carré en rectangle en rejoignant deux côtés vers le centre puis on roule le rectangle en boudin.
- Dernier repos : couvrir et laisser sur le plan de travail 2 à 3 heures à température ambiante (optionnel).
- Fariner le banneton en osier (avec ou sans le coton, selon que vous voulez voir les marques du banneton ou non sur la pâte).Note : sans banneton, utiliser un saladier recouvert d'une serviette de cuisine. A savoir que la taille est importante et aura un impact sur la forme finale du pain.
- Déposer la boule de pâte dans le banneton, côté lisse en bas. On peut pincer la pâte si besoin pour bien refermer le pli (du côté face à nous, non lisse).
- Couvrir et placer le banneton au réfrigérateur toute la nuit (12 à 15 heures).
- Retourner le banneton sur une feuille de papier sulfurisée coupée (voir recette en image).
- Préchauffer le four avec la cloche à pain (ou autre moule) à 500 °F ou 260°C pendant 30-45 minutes.
- Marquer le pain : fariner le dessus de la pâte et faire une entaille à 45° profonde avec une lame de rasoir. Vous pouvez aussi faire des petits dessins moins profonds.
- Enfourner : 20 minutes avec cloche fermée puis 10-15 minutes sans couvercle. Jusqu'à ce que le pain soit doré.
- Laisser refroidir complètement avant de découper.
D’autres articles qui pourraient vous intéresser
Le guide complet pour faire du pain au levain à la maison – étape par étape
5 ustensiles à utiliser pour faire son pain au levain à la maison


